


BAKING INSTRUCTONS
FOR THE GF RICE FLOUR MIXES

ITEMS YOU NEED FOR THE WETMIX
-
extra virgin olive oil
-
apple cider vinegar
-
measuring jug to measure water
-
a mixing jar with a well fitting lid
-
if you bought the starter set you will have the olive oil and acv (apple cider vinegar) in the small glass jar, ready to mix with your water
-
1.5 teaspoons of extra olive oil is needed to spread over the top of the loaf before baking


ITEMS YOU NEED FOR BAKING THE LOAF
-
mixing bowl
-
loaf pan (part of the starter set)
-
if you have your own loaf pan, it should be medium size, approximately
21.4cm x 11.3cm x 6.3cm
-
whisk
-
large spoon for mixing
-
baking paper (NOT greaseproof paper)
-
cut baking paper to size in 2 pieces:
1: 19cm x 26cm
2: 30cm x 9cm
-
measuring spoons, they are needed to measure a 3/4 teaspoon of olive oil to be spread onto the dough before baking and to measure the oil and acv for the wet mix
-
amounts need to be very accurate in gluten-free baking

THE WET MIX VARIES DEPENDING ON THE MIX
-
for the GF red rice bread mix fill a jar with 450 ml of water
-
for the GF red and green bread mix fill a jar with 420 ml of water
-
check the label to make sure you are getting the correct amount of water into the flour mix
-
the jar needs to be big enough to hold the water plus:
1.5 TB (tablespoons) of olive oil and
1.5 tea (teaspoons) of apple cider vinegar
-
if you bought the starter set, empty the content of the glass jar into the water jar
-
the oil and vinegar will sit on top of the water
-
just before adding it to the flour, mix it well by shaking the jar


MEASURING WATER
-
in gluten-free baking exact measurements are very important
-
please make sure your measuring device is accurate and don't use roughly 420 ml, but exactly 420 ml
-
the easiest option is a scale that can change to millilitres as in the first photo. With this one you can place it near a tap and fill it until you have exactly 420 ml
-
or if you have a measuring jug that has no line at 420 ml, like mine, measure 400 ml in the jug, plus 4 spoons of 5 ml, with a 1 teaspoon measuring spoon which holds 5 ml
-
should you need to add extra water only add another 10 ml
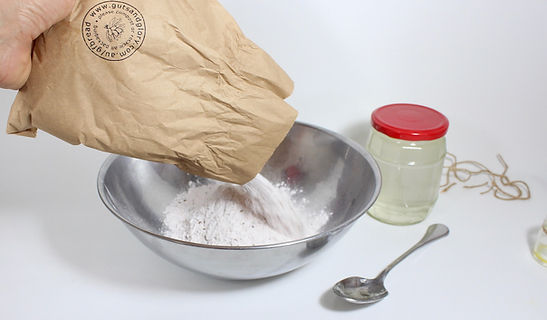
MIXING THE FLOUR MIX
-
add flour mix to bowl
-
use a whisk to mix up the flour mix
-
the flour has been mixed well, but due to the weight of the seeds, they could have settled at the bottom and they need to be mixed into the flour again before adding the wet mix
-
if you have a blender with a dough blade (NOT a chopping blade) you can use that. The dough blade is not sharp and simply mixes the flour

SHAKE THE WATER, OIL & VINEGAR MIX
-
make sure the lid is sealing the jar properly
-
before adding the wet mix to the dry mix, shake the jar well
-
once you shook it and it is mixed well, immediately add to the flour mix
.jpg)
.jpg)
.jpg)
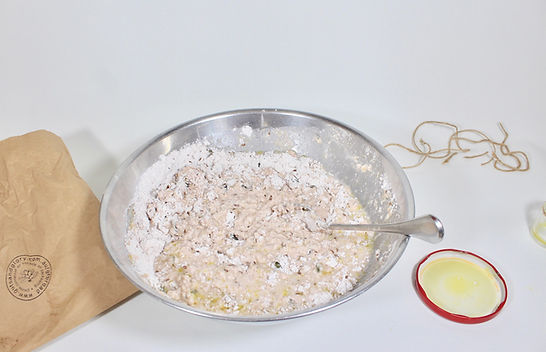
ADD WET MIX TO DRY MIX
-
use a large metal spoon to mix
-
mix until well mixed
-
mix until no more flour is visible
-
rest the mix for 15-20 minutes
-
pre-heat your oven on fan forced to 180 degrees celsius or 356 fahrenheit


ADD DOUGH TO LINED LOAF PAN
-
cut 2 pieces of baking paper to size:
one: 19cm x 26cm
two: 30cm x 9cm
-
line the tray with baking paper and add the dough
-
(I usually wipe the baking paper clean after baking and use it a few times)
-
use the back of a wet spoon to flatten the dough in the loaf pan

OIL THE TOP OF THE LOAF
-
drizzle 3/4 teaspoon of olive oil on top of the loaf and spread it evenly over the entire loaf
-
use the back of a table spoon to do this
-
this procedures makes sure that the crust does not get too hard
-
add the loaf to the pre-heated oven and bake for 70 minutes


REMOVE LOAF FROM THE OVEN
-
use a wooden cutting board or metal cooling rack under the hot pan and loaf
-
lift the loaf out of the pan and remove the paper
-
due to all ovens behaving differently, check the underside of the loaf
-
it should be firm and sound hollow when knocking it

COVER THE LOAF
-
cover the loaf with a tea towel
-
let it rest and cool before cutting it
-
as soon as it is cool enough, which takes about 1.5 to 2 hours, cut the bread into slices and freeze it
-
it is super yummy straight out of the oven, make sure to eat some immediately :)

CUT THE BREAD BY HAND
-
cut the bread to your desired thickness with a large sharp knife
-
my favourite thickness is 9mm, which I measured with a caliper
.jpg)
OR CUT THE BREAD WITH A BREAD MACHINE
-
I love how even the slices are when using a bread cutter
-
when cut evenly you will get 24 slices of bread
.jpg)
LAYER THE SLICES UNEVENLY
-
once the bread is cut, layer the slices in this off-set way before you freeze it
-
this helps to make it easy to break off a few slices as needed

FREEZE THE BREAD
-
freeze your bread once you cut it
-
use reusable containers

BREAD KEEPS BEST IN THE FREEZER
-
take the bread out of the freezer and defrost it in the toaster
-
then toast it to your desired level of colour and crunch
-
or use it in a sandwich press

NUTRITIONAL VALUE
-
raw weight: 700.45 grams
-
cooked weight: 1000.03 grams

STAINS ON PAPER?
-
don't worry, they are the natural oils from the seeds
-
just empty the flour mix into a jar if you want to store it for longer
GLUTEN-FREE BREAD
FLOUR-MIX NOW IN 3 COLOURS
ORIGINAL: GF RED RICE BREAD MIX
BEETROOT: GF RED BREAD MIX
SPIRULINA: GF GREEN BREAD MIX

RED AND GREEN BREAD
-
both loaves are based on the red rice flour loaf with added
-
beetroot powder in the red loaf
-
and spirulina powder in the green loaf


INSIDE
-
from the outside they look pink and turquoise
-
but inside they are a warm reddish beige and olive green colour...